Showing posts with label Recipe. Show all posts

Thursday, August 8, 2013

Skinny, Minty, Yummy Thin Mints

Thin Mints are a particularly delectable type of chocolatey, minty cookie that I found myself hooked on last summer while I was in New York.  They’re also remarkably easy to make at home and were a nice little way to stave off the late summer boredom I’ve been experiencing in my unemployed state.

190g flour
95g cocoa powder
1/4 tsp salt
1/4 tsp baking soda
200g butter
3 tbsp milk
1/2 tsp vanilla extract
1 1/2 tsps mint extract (rather than essence)
  • Mix together the flour, cocoa, salt and baking soda.  In a separate bowl, cream the butter. Add the sugar to the butter and beat together.  
  • Add the milk, vanilla, and mint and mix together.  
  • Slowly add the contents of the dry ingredients bowl while beating continuously.  
  • Resist the urge to eat the chocolatey, minty mess you’ve created - oh, go on then, have a taste.
  • Once all the ingredients are well combined, you can use your hands to roll the dough into a ball and then roll into a log shape.  
  • Wrap the dough in baking paper and put in the fridge for two hours. This gives you a couple of hours to read up on the news, do some knitting, wait patiently for your friends to finish work, or, if you happen to be as bored as I was this particular day, whip up a batch of regular chocolate chip cookies.
                            
  • Once the dough’s been chilled, take it out and slice it into biscuits. 
                            
  • Place them on a baking tray, taking care to leave enough space between each biscuit (they puff up quite a bit) and bake for 10-15 minutes at 170 degrees (C). 
                            
  • Once they’ve cooled you can top them off with some melted mint chocolate for a little extra gluttonous goodness.
                            

Happy baking!

Emma x

Tuesday, July 23, 2013

Fool's Macaroons

These coconut macaroons are so simple, any fool with a bowl and an oven could make them. Sweet and light, they're the perfect thing to have after a meal with a cup of tea. Or to bring to a party, or to have for breakfast....whatever you're into. I've forgotten where I found this recipe, but I've been making them for years, and thought it was one worth sharing!


                                                For about 16 macaroons you will need

                                                                   4 egg whites
                                                                200g castor sugar
                                                           320g dessicated coconut

Pre-heat the oven to 180 degrees (C)

Whisk or stir everything until the three ingredients come lightly together.
With wet hands, scoop up half a handful of the mixture and roll it into a ball in your two hands.
Continue making the balls, placing them on a baking tray as you go.

Bake for 15 minutes, until the macaroons are just starting to go a bit brown. If you take them out at this stage there will still be nice and soft inside.

Cool. Store. Eat. Repeat!

Tips:

These are quite sweet, but you can adjust the recipe to your own taste, i.e. using more or less coconut.
In Dublin I like to buy dessicated coconut in asian food shops, as you can usually get pretty big bags of the stuff there (500g, 1000g) for under a fiver.

Enjoy!

Joan


Sunday, August 22, 2010

Cookie Cookie!


I decided to get my cookie groove on today for two reasons. The first is that I've been very sick with a gastric flu over the past couple of days and was feeling significantly better today and NEEDED to do something after being bed-ridden for what seemed like an absolute age! The second reason was due to a little purchase I made while down in Cork in the beautiful O'Conaills chocolate shop. It is a haven for all chocolate lovers with a fantastic variety of different chocolates and divine marshmallow-endowed hot chocolate. Anyway, I'll stop my salivating! I bought a bag of milk, dark and white chocolate drops while ogling the chocolate wonders that surrounded me. It would have been criminal not to have made cookies when I was so laden with chocolate chips!

Due to the recent fragility of my little tummy, I decided not to risk tasting them! I think dry toast will be my daily menu for another few days. So I decided to parcel them up in some cellophane, embellish them with a ribbon and write a little note on some pretty Daintree paper. I gave them to two of my best friends and the last one to the boyfriend. My sister ate the other half of the tray and gave them her seal of approval!
Thanks to my sister Clare Doherty for taking the photos for me. I was very sleepy and she swooped in and clicked away. I think she did a fabulous job. Merci bien ma fille!

Here's the recipe:

Makes about 25 Cookies.

Ingredients

  • 300g Butter at room temperature
  • 1 Egg
  • 375g Caster Sugar
  • 450g Plain Flour, sifted
  • 1/2 teaspoon Baking Soda
  • 250g Chocolate Chips
Method

  1. Beat the butter, egg and sugar until completely combined.
  2. Mix in the flour and the baking soda.
  3. Finally add the chocolate chips or fruit if you prefer.
  4. The dough should stick together. If it is too crumbly, it means the butter was not soft enough to begin with, so beat for a little longer. If it still does not combine then add two tablespoons of milk.
  5. Wrap the dough in cling film and chill for one hour.
  6. Roll out on a floured board to 5mm thick and cut into rounds with a cookie cutter.
  7. Place on a baking sheet lined with parchment paper. Bake in an oven preheated to 170C/gas mark 3 for 20-25 minutes, or until golden brown.
  8. Transfer to a wire rack and cool.
Go forth and bake some cookies!

Have a good week.

Love Bríd


Tuesday, July 6, 2010

Dessert Delight!

Spring has rolled into summer causing college exams to fade away and law books to be placed at the back of a dusty cupboard not to be opened until September arrives bringing with it the challenge of finals. Oh joy! Most people choose to enjoy the summer, relax, recuperate and maybe do a little bit of work. Unfortunately I happen to be a lady with her mind on the money. Delightfully capitalistic I am! To feed my desire for cash, I'm currently working three jobs. By day I'm working in a solicitor's office, by night I'm a waitress and by weekend I'm working in Past Times. It's a hectic lifestyle for someone as small as I!


Naturally I have absolutely no free time so when I have to bake I need something quick that will also offer a high level of nom nom. In my world, the quality of a baked good is based on the scale of nom nom. The more times you nom when eating it, the better it is :) Mars Bar squares have proved themselves worthy of my love, admiration and nomming. Fabulously delicious and fat-filled. They are rocking my world at the moment. I baked them twice in one week for Sarah's present and to bring to our friend Rachel's bbq. They're quick, easy and delectable. They have the Bríd seal of approval and are befitting of a baker with no time on her little hands.

Here's the recipe:

Ingredients

6 x 65g Mars Bars
200g Butter
200g Rice Crispies
250g Milk Chocolate

Method
  • Cut the butter and Mars Bars into small chunks and place in a saucepan. Put over a low heat and stir with a balloon whisk until melted.
  • Add the Mars Bars/butter mixture to the Rice Crispies in a large bowl. Stir well until all ingredients are combined.
  • Put into a lined tin 30cmx20cmx5cm and press down with the palm of your hand until firm.
  • Melt the chocolate either in a microwave on low for one to two minutes, or over a saucepan of simmering water.
  • Pour over the biscuits, spread evenly with a palate knife and leave to set.
  • When set turn out on a board and cut into squares.
  • Et c'est fini!

Most importantly, the answer to the question is ALWAYS to nom!

Enjoy!

Love Bríd x x

Saturday, July 3, 2010

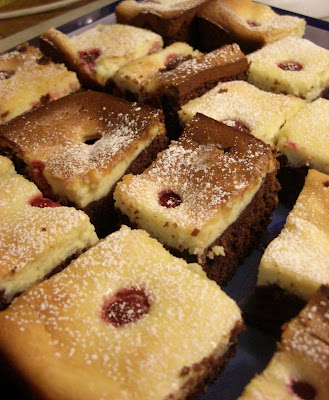
Chocolate Raspberry Cheesecake Brownies


These brownies were made for the adorable Rachel Mac Cann who threw an epic summer BBQ last Friday.


And for your own personal enjoyment, here's the recipe. Get baking!

AVOCA'S INSTRUCTIONS:

BROWNIE LAYER:
200g dark chocolate (70% cocoa solids)
200g unsalted butter
250g caster sugar
4 eggs
110g plain flour

Melt the chocolate and allow to cool a little.

Cream the butter and sugar together. Continue to whisk adding eggs and flour gradually. Stir in the melted, partially cooled chocolate. Spread the mixture into the bottom of a 22 x 22 x 8cm tin. Be sure to grease it first. 

FOR THE CHEESECAKE TOPPING:

400g cream cheese
150g caster sugar
2 eggs
1 drop of vanilla essence
120g raspberries

Whisk cream cheese, sugar, eggs and vanilla together. Spread ontop of brownie mixture. Sprinkle raspberries over the top. 

Cook @ gas mark 2, 150C for 45 mins.

MODIFICATIONS:

The suggested amount of raspberries delivers only one or ocassionally two raspberries per slice. I reccomend using half again as much.

It is vital not to get frustrated with the low heat and resultant long cooking time required. 45 minutes as suggested was not sufficient for the brownies to cook through. Whatever you do DO NOT up the heat in quest of a quick result as this will undoubtedly result in a burnt cheescake layer and a soggy uncooked brownie one. Be patient! Don't forget to preheat your oven try cooking just the brownie layer for ten minutes before you add the topping in order to give it a little head start and prevent a soggy base to your little gems.

Instead of 100g 70% solids chocolate I used 50g 70% and 50g dairy milk. The recipie is a rich one, a brownie recipe calling for four eggs and no rising agent is unquestionably going to be dense, no point making it too rich also or it would be unenjoyable. 

There is no way one drop of vanilla essence is enough, the taste would be utterly overcome by that of the cream cheese. Use one teaspoon instead. 

PHOTO CREDITS:

First two photos courtesy of Mr Ross McSherry, check some of his stuff out here: http://picasaweb.google.com/rossmcsherry
Nat
x