Sunday, February 24, 2013

Simple Shoulder Bag

Hello!

So my friend Jenni, crochet-er extraordinaire, recently taught me how to crochet. My first project was this shoulder bag for Clare. Getting the knack of the crochet-loop business was the only hard part, because the pattern could not be easier. You go around in a circle for a while, increasing the size, and then you stop increasing and just go around in a circle....forever. Or until you've reached desired size.


It's a great one to start crocheting with, and, because the pattern is so straight-forward, it's a great one for collapsing in front of the tv/radio with after a long day. Plus the circular rhythm of crocheting is pretty damn satisfying.


God it's just such a handy bag, now Clare can carry the essentials with her when she's cycling through her non-space!


My crochet on this was quite loose, I'm just on my second project now and am working on making it tighter. Clare is planning on lining the bag with some old fabric, which will make it a bit safer for coins and pens. When it came to the strap I decided to use an old leather belt, which I picked up in a charity shop for a euro, and then just raftily (/craftily) sewed on.


So yeah, give it a go! Crocheting is definitely the new knitting. (You heard it here first.) If you haven't crocheted before, you can either ask a friend who has to sit down with you till you get the hang of it, or you can go to youtube.

This isn't the exact pattern I used for this, but it's very close (and you don't need to consult it that much anyway).

If you happen to have a helluva lot of dreadlocks this pattern will make you a really nice hat too. and when you're just having one of those days...

So versatile.

Happy Sunday!

Joan

Sunday, February 17, 2013

A Wee Elephant

I've always loved elephants.  Majestic and imposing giants one moment, adorably lumbering and awkward the next.  They also happen to be a delightful little knitting project.


This little guy was very quick and simple to make, taking only a couple of lazy winter afternoons to whip up.


Unfortunately the blog on which I found the pattern for this little fellow has been lost to some great internet purge.  Thankfully, however, there will always be a demand for little woolen elephants and so here's a link for an equally lovely pattern.


Happy crafting!

Emma x

Sunday, February 10, 2013

Tea Cosy!

The ritual of tea-making is such an important part of everyday life. It is a balm for all problems, from exhaustion to bad news. Offering a cup of tea is a gesture of friendship, and the best way to welcome a visitor.


Increasingly, however, making tea only entails dunking a teabag into a mug of hot water. We believe it's high time the teapot was dusted off and returned it to its former iconic status- dressed up in proper ceremonial robes, in the form of a lovely handmade cosy.


This was my first foray into crocheting, and it turned out to be much easier than I had expected. I would definitely recommend this pattern to anyone looking for a simple beginners project. It is made entirely using double crochet stitch. The pink and yellow colours make it look a bit like a Battenburg cake- ideal for afternoon tea...


Here's a link to the pattern- you may need to alter it slightly to fit your own teapot!


I'll leave you with some words of wisdom from Billy Connolly:

“Never trust a man who, when left alone in a room with a tea cozy, doesn't try it on. ”


Clare x

Monday, February 4, 2013

Emily The Dinosaur.

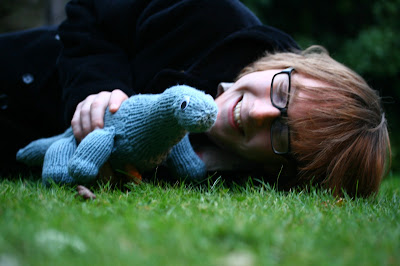
This is my friend Fionn. Fionn and I spent a great deal of time together drinking tea, eating biscuits, chatting, listening to jazz and knitting dinosaurs.


Fionn had never knitted before and this was his first project. Pretty impressive eh? He is most definitely a natural.

Isn't she just lovely? Fionn named her "Emily" and now she is his beloved dinosaur friend.


 We have plans to knit sea creatures together in the near future so watch this space... An unholy knitting alliance we are!


We're going to be implementing some changes on the blog from this week going forth. Nat and I find ourselves so swamped with our Masters that we have not had enough time to dedicate to our beloved blog. We have decided to rope in three of our crafty friends to help us out.

Clare, Joan and Emma are all very talented knitters/crocheters so you'll be seeing their work on here as well as ours! Very exciting. It also means that you will see at least one post per week from Crafty Students. Now isn't that something to look forward to? I am mighty pleased and I hope you all are too!

Have a wonderful week!

Brid x

Tuesday, December 25, 2012

Merry Christmas from Crafty Students!

Merry Christmas and a Happy New Year from Natalie and Bríd. We hope you've all had an amazing day. Thank you for keeping up with the blog and for all your lovely comments!

Here are some Christmas cards Bríd made from vintage Christmas stamps.


Best Wishes,

Bríd & Nat

Sunday, November 11, 2012

A Little Blue Owl.

My obsession with knitting owls continues. It's been a year long love affair at this stage. It is just such a quick and easy pattern to knit and the owls are just so adorable. Here is the pattern in case you'd like to give it a try and knit a little owl for yourself.


Once again, thanks to Conor Barry for the photos. They are so very wonderful. Thank you for looking like an oddball putting a knitted owl in trees and taking pictures for the sake of my blog. You are awesome!

Hope you're all having a lovely weekend and enjoying a lazy Sunday!

B x

Sunday, November 4, 2012

An Attempt at Altered Books.

After reading a bit about Altered Books, I decided to attempt one myself. I decided to go for a forest theme. It's very easy to make and it doesn't take too long. The folding and the cutting do get a little bit tedious but if you have cups of tea and good music, it's not too bad!


Instructions

1. Pick an old hardcover book that you have no interest in. Charity shops and Second-hand Bookshops are a great place to find cheap, hardcover books.

2. Choose some nice paper to stick on the inside cover. Cut it to the correct size, making sure it's not crooked. A guillotine is the best thing for this.

3. Fold all of the pages of the book in half.

4. Cut out indentations for your creatures to live in. I cut a semi circle out of a few pages to create the grooves that I would then stick animals in. I used a nail scissors to do this. It takes a little bit of time to make sure that all the semi circles are the same.

5. Cut out pictures of animals from an old book. I had an old nature book that I used for my animal images. You could also print pictures of the internet or use another source. Then stick the animals in the grooves you have already cut.

6. Draw and cut some green leaves from paper and stick them in between your pages.


Ways to display it:

1. Put a little hook on the back of it and hang it on the wall.

2. Prop it up on a shelf against the wall.


If you do try one, send me a link to the photo. I would love to see it!

Thanks to Conor Barry for the photos. They are quite lovely. Conor is an awesome writer for the "University Observer" and you can see his writing here. It will make you chortle

Happy Crafting.

B x